
JavaScript
❏ 参考書
❏ JavaScriptってどういうもの
|
・ブラウザを操作するための言語 ・HTMLやCSSだけではできないことをする ・その場でリアルタイムに書き換えて一部コンテンツを入れ替えたり、画像のスライドショーのような動きをつけることができる ・いつ処理をするかを決めるきっかけを、JavaScriptでは「イベント」と呼ぶ ・HTMLドキュメント内に<script>、</script>を追加すれば、その中にJavaScriptを直接書くことができる ・<script>タグは、<head>~</head>内、または<body>~</body>内のどこにでも追加できが、一般的に</body>終了タグの直前に追加する ・JavaScriptファイルの拡張子は「.js」、ファイルの文字コードは必ずUTF-8にする ・一般的にはHTMLとは分けて外部JavaScriptファイルを作成する ・id名を利用して要素を取得。class属性でCSSスタイルを適用する |
❏ 基礎情報
|
◯ use strict |

|
◯ 文字コード形式「UTF-8」 |

|
◯ 規格 |

|
◯ 変数名 |

|
◯ 代入演算子 |

❏ セクション
≫ 2-3 ダイアログボックス
|
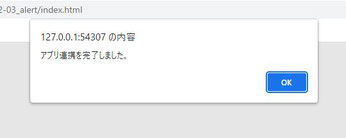
◯windowオブジェクトのalertメソッド アラートダイアログボックスを表示 |
|
≫ 2-4 要素を取得・コンテンツ書き換え

|
◯documentオブジェクト ブラウザに表示されているHTMLや、それに関連するCSSを操作するための機能が多数用意されている |
|
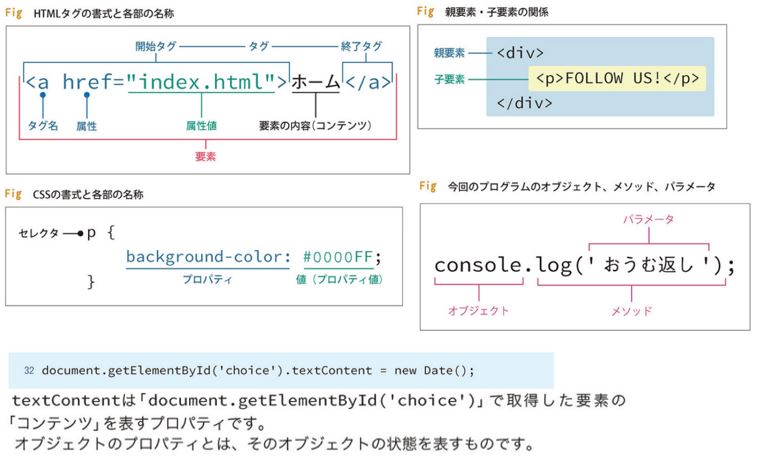
◯getElementByIdメソッド ( ) 内に指定されたid名を持つ要素を丸ごと取得する |
|
◯textContentプロパティ 取得した要素のコンテンツを表す。プロパティの値は読み取り・書き換えが可能 |
|
≫ 3-1 確認ダイアログ、if文、3-3 else if
|
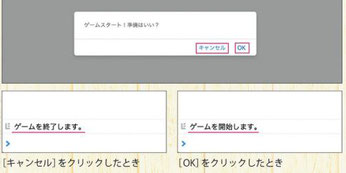
◯windowオブジェクトのconfirmメソッド 確認ダイアログボックスを表示。trueまたはfalseを返す |
|
|
≫ 3-2 プロンプト、変数・定数
|
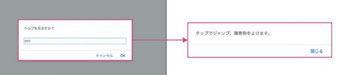
◯プロンプト テキストフィール付きのダイアログボックス ◯windowオブジェクトのpromptメソッド プロンプトを表示。ユーザーが「OK」をクリックした時だけリターンが返ってくる |
|
◯let ・const letは変数、constは定数 |
|
◯変数の寿命 画面遷移したり、ウィンドウズやブラウザを閉じたら変数はクリアされる |
|
≫ 3-4 比較演算子、データ型
|
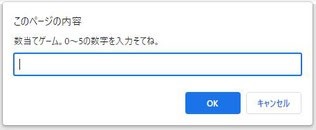
◯Mathオブジェクトのrandomメソッド ランダムな数値を発生させる。Math.random() * 6 はランダムに0~5までの数値を生成する |
|
◯parseIntメソッド 整数に変換。変換出来ない時はNaN(Not a Number)という特殊な数値に変換される |
|
≫ 3-5 異なるメッセージを表示、論理演算子
|
◯Date().getHours() 現在の時間(h)を24時間時計で取得 |
|
≫ 3-6 基本の繰り返し、文字列連結
|
◯while 繰り返し |
|
◯ i + '枚' +の前後が数値の時は足し算、文字列の時は連結する |
|
≫ 3-8 ファンクション

|
◯function 関数 |
|
≫ 3-10 要素を挿入してリスト表示、配列
|
◯for(let 変数名 of 配列名) { } 配列の項目をすべて読み込む |
|
◯pushメソッド 配列の最後にデータを追加する |
|
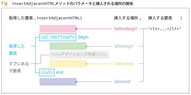
◯insertAdjacentHTML('挿入する場所', '挿入する要素') 取得要素の前後または子要素として別の要素を挿入。 beforeendの場合、取得した要素の子要素として挿入。 すでに子要素がある場合はその後に挿入 |
|
≫ 4-1 formの入力内容を取得、イベント処理

|
◯<form action="#" id="form"> action属性:データ送信先URL。どこにも送信しないときは「#」を指定 ◯<input type="text" name="word"> name属性:サーバーに送信されるデータの名前 |
|
◯onsubmitイベント 送信ボタン押下直後で、サーバーにデータ送信する直前に発生するイベント。このタイミングでJavaScriptで何らかの処理をしたい場合はonsubmitにファンクションを代入 |
|
◯function(今回はonsubmit発生時に実行される) イベント発生時に実行させたい処理を書く イベントに代入するファンクションには、ファンクション名、returnはない ◯valueプロパティ フォーム部品に入力された内容の保続先 取得したform要素.フォーム部品のname属性.value ◯eventオブジェクト イベントオブジェクトには主に以下が含まれている ・発生したイベント種類(今回はonsubmit) ・イベントが発生したタグ(今回は<form id="form">) ・イベントの動作を変更するメソッド ◯preventDefaultメソッド ページの再読み込みをしないようにする。フォムの基本動作のキャンセルについては位置No. 173 を参照
|
|
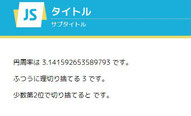
≫ 4-3 Math、小数点第◯位切り捨て
|
◯Mathオブジェクト Mathオブジェクトのプロパティは全て読み取り専用 よってnewで初期化する必要がない ◯Math.PIプロパティ 円周率の定数 ◯Math.floorメソッド 小数点以下を切り捨て ◯小数点◯位で切り捨てる方法 Javascriptに小数点◯位で切り捨てるメソッドはないので 以下の手順で求める→pointメソッド 1. 元数値の小数点を右にシフト(10の◯乗掛ける) 2. 小数点以下を切り捨てる 3. 小数点を左にシフト(10の◯乗割る) |
|
≫ 5-1 時間差の算出、タイマー機能、0埋め

|
◯new Date(); 現在日時 ◯new Date(年, 月, 日, 時, 分, 秒, ミリ秒); 日時を設定して初期化。月は「実際の月 - 1 」 ◯setHours、setMinutes、setSeconds 時、分、秒を設定(年月日は現在) ◯getTime() 1970年1月1日0時0分から当オブジェクトの基準日までの経過ミリ秒を取得 ◯Math.floor(rest / 1000) % 60; 秒を取得(ミリ秒を秒単位にして60未満を取得) ◯Math.floor(rest / 1000 / 60) % 60; 分を取得 ◯setTimeout(ファンクション, 待ち時間 (ミリ秒 ) ) 一秒後にファンクションを呼び出す ◯Stringオブジェクト.padStart(文字数, 文字) 文字列を指定した文字数分だけ指定した文字で埋める |
|
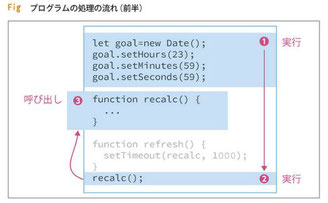
プログラムの流れ
|
◯処理の流れ前半 1. HTMLを読み込み、Dataオブジェクトで変数goalを設定 2. recalcファンクションを呼び出し 3. countdownファンクションを呼び出し残り時間を計算 |

|
◯処理の流れ後半 a. recalcファンクションの最後でrefreshファンクションを呼び出し1秒後に recalcファンクションを実行
|
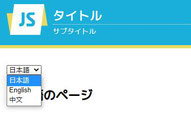
≫ 5-2 プルダウンメニュー、画面遷移
|
◯<select name="select">、<option value="index.html"> selectのname属性と選択されたoptionのvalue属性がセットになって、サーバー送信される ◯onchangeイベント フォームに入力された内容が変わったときに発生 ・テキストフィールド:入力内容が変わったとき ・プルダウンメニュー:選択項目が切り替わったとき ◯document.getElementById('form').select.onchange プルダウンが替わった時のイベント。フォーム部品の<select>のname属性を指定 ◯document.getElementById('form').select.value 選択された<option>のvalue属性を取得するには、その親要素である<select>のvalueプロパティを読み取る ◯locationオブジェクトのhrefプロパティ hrefプロパティの値を変更するとすぐに次のページに移動する。locationオブジェクトはwindowsオブジェクトと同様にブラウザに初めから組み込まれている。URLを調べたり、閲覧履歴を管理したりする機能がある ◯<html lang="ja"> <html>タグのlang属性。そのページに書かれている言語(言語コード)を指定 ◯selected属性:ブーリアン属性 画面が表示されたときの選択箇所 ◯document.querySelectorメソッド カッコ内のCSSの「セレクタ」にマッチする要素を取得 ・タイプセレクタ:html ・属性セレクタ :option[value="index.html"] |
プログラムの流れ
|
◯ブラウザにページが読み込まれたとき onchangeイベント以外の部分が実行される ◯プルダウンメニューで今と違うoptionが選択された時 onchangeイベントが発生し、locationオブジェクトのhrefプロパティが変更され次のページに移動する。そしてonchangeイベント以外の部分が実行される |
|
|

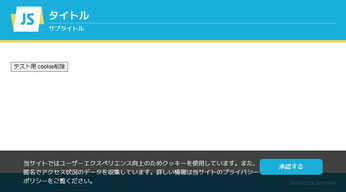
≫ 5-3 クッキー、HTML要素の削除
|
◯ライブラリ宣言 ライブラリを使用する際は、それを利用するより前に読み込むのが鉄則 |
|
◯js.cookieライブラリ クッキーのデータを操作するオープンソースのライブラリ |
|
◯cookie ブラウザとWebサーバー間のデータのやり取りに使用 ◯Cookies.get('クッキー名') 指定クッキー名の値を取得 承認するボタン押下前はundefined ◯Cookies.set('クッキー名', '値', {expires: 有効期限}) 指定クッキー名に値を設定 expiresで有効期限(日単位)を設定 有効期限が未設定だとブラウザ終了と同時に消える ◯Cookies.remove('クッキー名') 指定クッキー名を削除 ◯取得した要素.removeChild(削除する要素) 指定されたHTML要素を削除 div id="privacy-panel">はbodyの子要素なので、 document.body.removeChild(panel); でdocument.bodyのpanel要素が削除される |
プログラムの流れ
|
◯画面初期表示時のログ出力順
<<< 1 >>> ◯承認ボタン押下時のログ出力順 <<< 4>>>のみ
◯画面再描画(F5)押下時のログ出力順
<<< 1 >>> ◯テスト用 cookie削除ボタン押下時のログ出力順 <<< 5>>>のみ |
|
≫ 5-4 HTMLタグの属性の取得、更新

|
◯document.querySelectorAll(cssセレクタ) cssセレクタにマッチする要素すべてを取得。今回は<img class="thumb" …>の全てが配列の様な形で取得される ◯forEachメソッド 配列.forEach(function(item, index) { 配列の全ての項目に対して繰り返される }); itemには配列の項目が1つ代入される indexには配列の項目のインデックス番号が代入される ◯this イベントが発生した要素を指す。thisはイベントに設定するファンクション内で使用できる ◯data-◯◯属性(カスタムデータ属性)、dataset ◯◯は自由。取得した要素.dataset.◯◯で値を取得できる 今回はthis.dataset.image ◯画像の切り替え <img>タグのsrc属性を書き換えるだけ |
|
≫ 5-5 次へ/前へボタン、プリロード、DOM操作

|
◯配列.length 配列のデータ数 ◯function changeImage(num) 配列indexが0以上、配列データ数未満の間はTrue ◯document.getElementById('main_image').src = images[current]; id="main_image"のsrc属性に、配列imagesのcurrent番目のデータを設定 ◯function pagenum() id="page"を取得しtextContentにテンプレート文字列を使って「現在のページ数/画像の点数」を設定 ◯${変数名} 文字列中に変数を埋め込むには "${" と "}" で変数名を囲む ◯画像のプリロードとは 予めスライドさせる画像をメモリーに保存しておくこと ◯DOM操作 HTMLやCSSを書き換える処理のこと |
|
❏ jQuery
|
◯ jQueryとは ・JavaScriptのプログラミングでよく行われる定型的な処理を書きやすくしてくれる、オープンソースのライブラリ ・jQueryはJavaScriptの補助ツールであり、jQueryというプログラム言語があるわけではない ・特にHTMLやCSSの書き換え、イベントの設定などのDOM操作や、Ajaxが得意 ・公式サイト https://jquery.com ・バージョン1.9で仕様が大きく変わっったので、バージョン1.9以降を使用する ・ほとんどが以下の順序で処理される 1 イベントを設定したい要素を取得する - $( )メソッドとCSSセレクタを使用 2 その要素にイベントを設定する - JQueryのonメソッドを使用 3 イベントが発生したときの処理を実行する - その時々によって異なる ・jQueryでは、$( )で取得された要素が複数ある場合、そのすべてにメソッドを実行する
補足 参考サイト -jQuery コーディングの意味 リンク |
≫ 6-1 <h3>がクリックされると弟要素の<ul>が表示・非表示を切り替える
|
◯$(document).ready(function(){ ~ }); HTMLが読み込まれたらfunctionの{ ~ }を処理する。 JQueryを使ってプログラムを書くときは必ず入れる。 ◯$('.submenu h3') <div class="submenu">の中にあり<h3>を取得。 ( )内にCSSセレクタを含むると、そのセレクタにマッチする全ての要素を取得する。document.querySelectorメソッドと同じような動きをする。 ・$( )メソッド:jQueryオブジェクトを返す ・document.querySelectorメソッド:配列を返す |

|
◯$('.submenu h3').on('click', function(){ onメソッドの第1パラメータにイベントを指定('click'や'submit'など)第2パラメータにファンクションを指定し{ ~ }内にイベント発生時の処理を記述する ◯$(this) thisはイベントが発生した要素。それを$( )で囲んでjQueryオブジェクトに変換している ◯$(this).next() イベントが発生した要素の次の要素を取得(ここではクリックされた<h3>の次にある<ul>が取得される)。このnextを「トラバーサル」と呼ぶ ◯$(this).next().toggleClass('hidden'); 取得した要素に( )内のパラメータで指定されているクラスがついていなければ追加、ついていれば削除する。これによりCSSに書いた「.hidden」が適用されたりされなかったりすることでサブメニューが表示・非表示が切り替わる |
|
≫ 6-2 ドロワー(ナビゲーション画面を表示)

|
◯ドロワーナビゲーション 実現するには「ページ」と、横から出てくる「メニュー」を作成する。そしてCSSを駆使してメニューをページの右側でかつブラウザウィンドの外側に配置し、クリックされたらページとメニューを丸ごと移動させる。 ◯<nav> navタグ(nav要素)は、主要なナビゲーションを表す ◯ナビゲーション ウェブサイト内の他のページへのリンクや、ページ内リンクなどのこと(=ハンバーガーメニュー) ◯ハンバーガーメニュー(≡) サイト画面の左右の上に表示されている3本ラインのアイコンのこと。サイト内のコンテンツ一覧を開閉できる。ドロワーメニューともいう ◯transformプロパティ 要素を移動、拡大・縮小・回転させる。 transform: translate3d(x軸移動量, y軸移動量, z軸移動量); 今回はページ全体を左に-270ピクセル移動させた ◯$('#open_nav').on('click', function(){ ハンバーガーメニュー(≡)のクリックイベント ◯$('#wrapper, #nav') カンマで区切って複数のセレクタを指定可能 ◯$('#wrapper, #nav').toggleClass('show'); 指定セレクタにshowクラスをつけたり削除したりする |
|
|
❏ Ajax
|
◯ Ajaxとは ・ブラウザからリクエストが発生すると、新しくやってきたデータが、それまでのデータを完全に置き換える ・Ajax(非同期通信)とは、通常のブラウザからのリクエストに代わって、JavaScriptからWebサーバーにデータをリクエストし、 レスポンスもJavaScriptが受け取る仕組み。それにより表示されたページが完全に書き換わらずページの一部だけを書き換えられる ・AjaxはJavaScriptの機能。巣のJavaScriptでプログラムを書くより、jQueryを使った方が簡単に記述できる |
≫ 6-3 AjaxとJSON
|
◯Ajaxの基本形 $.ajax({url: 'data.json', datatype: 'json'}) .done(function(data){ データがダウンロードできたときの処理 }) .fail(function(){ データのダウンロードに失敗したときの処理 }); ------------------------------------------------------------------------ urlにはダウンロードしたいデータのURLを指定する datatypeにはデータに形式を指定する
◯.done(function(data){ ダウンロードされたデータはfunctionパラメータ「data」に保存される
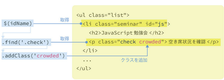
data.jsonデータを元に、要素にclass属性を追加する ◯if (item.crowded === 'yes') { forEachメソッドで {"id":"js","crowded":"yes"}が読み込まれたときTrueになり定数idNameに「#js」が代入される ◯$(idName) 定数idNameの文字列をidセレクタにして要素を取得 ◯$(idName).find('.check').addClass('crowded'); 取得した要素の子要素のうちクラス名が「.check」の要素を取得して、その要素にクラス「crowded」を追加 |
<p class="check">がクリックされたら時の処理
|
◯$('.check').on('click', function(){
<p class="check">空き席状況を確認</p>がクリックされるとfunction内の処理が実行される ◯if($(this).hasClass('crowded')) { クリックイベントが発生した<p class="check">空き席状況を確認</p>に「crowded」クラスがあるかを判定 ◯$(this).text('残席わずか').addClass('red'); あればその要素のテキストを「残席わずか」に変え、さらにその要素にクラス「red」を追加
|
|
❏ オリジン
≫ 7-1 ブラウザの位置情報

|
◯navigator.geolocation.getCurrentPosition (success, fail); ブラウザの位置情報を取得。第1パラメータは位置情報が取得できたとき呼び出されるfunction名、第2パラメータはエラー発生時に呼び出されるfunction名を指定する |
|
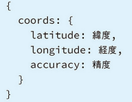
◯function success(pos)
posオブジェクトには位置情報が保存されている |
|
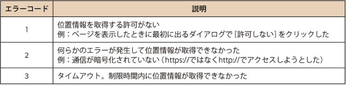
◯function fail(error)
errorオブジェクトのcodeプロパティ |
|
◯$('#loc').text(`緯度:${lat} 経度:${lng}`);
id属性locを使って要素を取得し、そのコンテンツのテキストを書き換えている。textメソッド()内はテンプレート文字列を使って成型している |
|
≫ 7-2 現在地の向こう5日間の天気を表示

|
◯$.ajax({ url: url, data: { appid: appId, lat: lat, lon: long, units: 'metric', lang: 'ja' } }) APIにデータのリクエストをする際に必要ないくつかの情報を$.ajaxメソッドのdataプロパティにセットする appid ー API KEY lat ー 緯度 lon ー 経度 units ー データの単位。metricにするとメートル法、 摂氏(℃)のデータを取得できる lang ー 言語を設定 ◯data.list.forEach(function(forecast, index) {~} |
|
配列の項目を一つ一つ繰り返し読み取る。listプロパティの各項目がforecastパラメータに保存される 例 天気の説明 forecast.weather[0].description 気温 Math.round(forecast.main.temp) 日時 forecast.dt ◯Mathオブジェクトのroundメソッド 小数点以下を四捨五入 ◯`images/${forecast.weather[0].icon}.svg` 画像ファイルのパスを整形。forecastのweather[0].iconには"01d"などの画像ファイル名が格納されている |

|
◯dateTime = new Date(utcToJSTime(forecast.dt)) Dateオブジェクトの初期化に経過みり秒を指定できる。 forecast.dtはUNIX UTC時間(秒単位)なので1000倍する |
|
◯dateTime.getMonth() + 1
月を取得するとっきは1を加算する ◯String(dateTime.getMinutes()).padStart(2, '0') padStartメソッドで2桁に0埋め ◯$('#place').text(data.city.name + ', ' + …); 都市名、国名を<h3 id="place"></h3>の中に出力 ◯$('#weather').html(currentWeather); 取得した要素(<div id="weather"></div>)を指定されたHTML(currentWeather)で書き換える ◯$('#forecast').append(tableRow); 取得した要素(<table id="forecast"></table>)にテーブル行のHTMLを挿入 |
|
|